Excellent Cheat sheets
http://www.glump.net/howto/vim_graphical_cheat_sheet
Tuesday, April 7, 2009
Monday, November 10, 2008
Changing the home directory of Linux user
How do you modify a user's home directory in Unix/Linux?
1. Login as a user with sudo privileges.
2. Enter this command:
sudo nano /etc/passwd
3. Nano text editor opens up. Locate the username you would like to change the home directory of (the last added user is in the end), and just enter whatever directory you would like. For example, the home directory for the user jack is set to /home/jack in this file:jack:x:1000:1000:Jack,,,:/home/jack:/bin/bash
But I want him to use a home directory of /home/whatever. So I just change the above line to:jack:x:1000:1000:Jack,,,:/home/whatever:/bin/bash
Now when the user jack logs in, his home directory would be /home/whatever.
Wednesday, September 3, 2008
Introduction to Aperture in Digital Photography
Introduction to Aperture in Digital Photography
What is Aperture?
Put most simply - Aperture is ‘the size of the opening in the lens when a picture is taken.’
When you hit the shutter release button of your camera a hole opens up that allows your cameras image sensor to catch a glimpse of the scene you’re wanting to capture. The aperture that you set impacts the size of that hole. The larger the hole the more light that gets in - the smaller the hole the less light.
Aperture is measured in ‘f-stops’. You’ll often see them referred to here at Digital Photography School as f/number - for example f/2.8, f/4, f/5.6,f/8,f/22 etc. Moving from one f-stop to the next doubles or halves the size of the amount of opening in your lens (and the amount of light getting through). Keep in mind that a change in shutter speed from one stop to the next doubles or halves the amount of light that gets in also - this means if you increase one and decrease the other you let the same amount of light in - very handy to keep in mind).
One thing that causes a lot of new photographers confusion is that large apertures (where lots of light gets through) are given f/stop smaller numbers and smaller apertures (where less light gets through) have larger f-stop numbers. So f/2.8 is in fact a much larger aperture than f/22. It seems the wrong way around when you first hear it but you’ll get the hang of it.
Depth of Field and Aperture
There are a number of results of changing the aperture of your shots that you’ll want to keep in mind as you consider your setting but the most noticeable one will be the depth of field that your shot will have.
Depth of Field (DOF) is that amount of your shot that will be in focus. Large depth of field means that most of your image will be in focus whether it’s close to your camera or far away (like the picture to the left where both the foreground and background are largely in focus - taken with an aperture of f/22).
Small (or shallow) depth of field means that only part of the image will be in focus and the rest will be fuzzy (like in the flower at the top of this post (click to enlarge). You’ll see in it that the tip of the yellow stems are in focus but even though they are only 1cm or so behind them that the petals are out of focus. This is a very shallow depth of field and was taken with an aperture of f/4.5).
Aperture has a big impact upon depth of field. Large aperture (remember it’s a smaller number) will decrease depth of field while small aperture (larger numbers) will give you larger depth of field.
It can be a little confusing at first but the way I remember it is that small numbers mean small DOF and large numbers mean large DOF.
Let me illustrate this with two pictures I took earlier this week in my garden of two flowers.
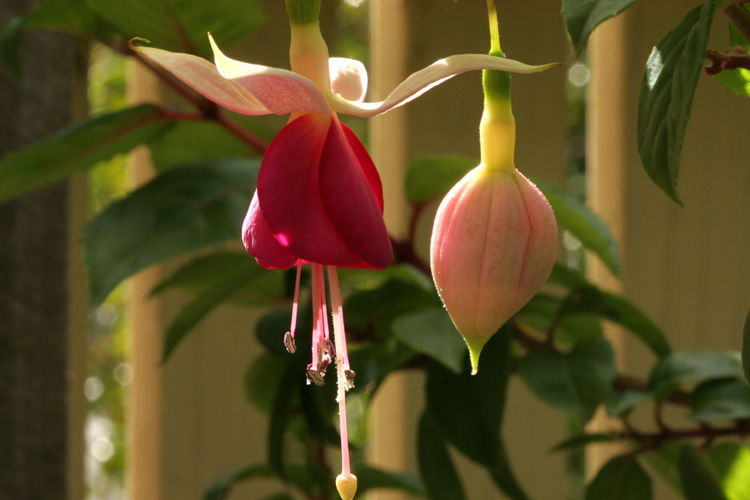
The first picture below (click them to enlarge) on the left was taken with an aperture of f/22 and the second one was taken with an aperture of f/2.8. The difference is quite obvious. The f/22 picture has both the flower and the bud in focus and you’re able to make out the shape of the fence and leaves in the background.
The f/2.8 shot (2nd one) has the left flower in focus (or parts of it) but the depth of field is very shallow and the background is thrown out of focus and the bud to the right of the flower is also less in focus due to it being slightly further away from the camera when the shot was taken.

The best way to get your head around aperture is to get your camera out and do some experimenting. Go outside and find a spot where you’ve got items close to you as well as far away and take a series of shots with different aperture settings from the smallest setting to the largest. You’ll quickly see the impact that it can have and the usefulness of being able to control aperture.
Some styles of photography require large depths of field (and small Apertures)
For example in most landscape photography you’ll see small aperture settings (large numbers) selected by photographers. This ensures that from the foreground to the horizon is relatively in focus.
On the other hand in portrait photography it can be very handy to have your subject perfectly in focus but to have a nice blurry background in order to ensure that your subject is the main focal point and that other elements in the shot are not distracting. In this case you’d choose a large aperture (small number) to ensure a shallow depth of field.
Macro photographers tend to be big users of large apertures to ensure that the element of their subject that they are focusing in on totally captures the attention of the viewer of their images while the rest of the image is completely thrown out of focus.
Depth of Field and Aperture
There are a number of results of changing the aperture of your shots that you’ll want to keep in mind as you consider your setting but the most noticeable one will be the depth of field that your shot will have.
Depth of Field (DOF) is that amount of your shot that will be in focus. Large depth of field means that most of your image will be in focus whether it’s close to your camera or far away (like the picture to the left where both the foreground and background are largely in focus - taken with an aperture of f/22).
Small (or shallow) depth of field means that only part of the image will be in focus and the rest will be fuzzy (like in the flower at the top of this post (click to enlarge). You’ll see in it that the tip of the yellow stems are in focus but even though they are only 1cm or so behind them that the petals are out of focus. This is a very shallow depth of field and was taken with an aperture of f/4.5).
Aperture has a big impact upon depth of field. Large aperture (remember it’s a smaller number) will decrease depth of field while small aperture (larger numbers) will give you larger depth of field.
It can be a little confusing at first but the way I remember it is that small numbers mean small DOF and large numbers mean large DOF.
Let me illustrate this with two pictures I took earlier this week in my garden of two flowers.
The first picture below (click them to enlarge) on the left was taken with an aperture of f/22 and the second one was taken with an aperture of f/2.8. The difference is quite obvious. The f/22 picture has both the flower and the bud in focus and you’re able to make out the shape of the fence and leaves in the background.
The f/2.8 shot (2nd one) has the left flower in focus (or parts of it) but the depth of field is very shallow and the background is thrown out of focus and the bud to the right of the flower is also less in focus due to it being slightly further away from the camera when the shot was taken.
The best way to get your head around aperture is to get your camera out and do some experimenting. Go outside and find a spot where you’ve got items close to you as well as far away and take a series of shots with different aperture settings from the smallest setting to the largest. You’ll quickly see the impact that it can have and the usefulness of being able to control aperture.
Some styles of photography require large depths of field (and small Apertures)
For example in most landscape photography you’ll see small aperture settings (large numbers) selected by photographers. This ensures that from the foreground to the horizon is relatively in focus.
On the other hand in portrait photography it can be very handy to have your subject perfectly in focus but to have a nice blurry background in order to ensure that your subject is the main focal point and that other elements in the shot are not distracting. In this case you’d choose a large aperture (small number) to ensure a shallow depth of field.
Macro photographers tend to be big users of large apertures to ensure that the element of their subject that they are focusing in on totally captures the attention of the viewer of their images while the rest of the image is completely thrown out of focus.
INFLUENCE OF LENS APERTURE OR F-NUMBER
The aperture range of a lens refers to the amount that the lens can open up or close down to let in more or less light, respectively. Apertures are listed in terms of f-numbers, which quantitatively describe relative light-gathering area (depicted below).

Note: Above comparison is qualitative; aperture opening (iris) is rarely a perfect circle,
due to the presence of 5-8 blade-like lens diaphragms.
Note that larger aperture openings are defined to have lower f-numbers (often very confusing). These two terms are often mistakenly interchanged; the rest of this tutorial refers to lenses in terms of their aperture size. Lenses with larger apertures are also described as being "faster," because for a given ISO speed, the shutter speed can be made faster for the same exposure. Additionally, a smaller aperture means that objects can be in focus over a wider range of distance, a concept also termed the depth of field.
When one is considering purchasing a lens, specifications ordinarily list the maximum (and maybe minimum) available apertures. Lenses with a greater range of aperture settings provide greater artistic flexibility, in terms of both exposure options and depth of field. The maximum aperture is perhaps the most important lens aperture specification, which is often listed on the box along with focal length(s).
Wednesday, June 25, 2008
Tuesday, June 24, 2008
Learning Emacs
The learning curve for Emacs is difficult but challenging. I have been using Emacs for a few years now. But I am still a beginner using less than 5 different keys of the Emacs capabilities.
Few Emacs shortcuts are very useful and I shall summarized them below.
Etags
Etags are useful feature that could quickly tag files to be used in Emacs and vi.
Example:
#etags file1.c file2.h
This will generate a TAGS in the directory. Once you execute the opened file in emacs with require"Alt+.", the message "Find tag: (default printf)" will appear. Then it will ask you the TAGS file. Visit tags table: (default TAGS ~/test/). If the tag table can be found, the cursor will jump to the definition. To get back to the original cursor position, use "Alt+Shift+*".
Search
Searching for a text in Emacs is easy. Forward search using "Ctrl+s" and I-search: will appear.
Reverse the search using "Ctrl+r" and I-search backward: will appear.
To repeat the search, just press "Ctrl-s" or "Ctrl-r" repeatedly.
Cut and Paste
This is a complex operation using keyboard which requires lots of practice.
On the required line, "Ctrl+space" to start the cursor mark. Mark set will appear to indicate the operation is correct. The next command is sort of an invisible command. But rest assured that it just worked. Then move the cursor to the end location. "Esc" then "w" to copy the information from the start of the cursor to current cursor position. This completes the copy operation.
Next, is the paste operation. Go to the required location and "Cltr+y" will paste(a.k.a yank) the buffer(a.k.a clipboard) information.
Undo
This operation is very important because it will undo any mistake that you have made.
In most Emacs book, it is written in "C-x-u" which means "Ctrl-u" + "u".
Saving the file
"Ctrl-x" + "Ctrl-s" will save the current file.
Exit Emacs
"Mx-Ctrl-c" or "Cltr-x" + "Ctrl-c"
Extra Programming feature of Emacs
Splitting the Window
"Ctrl-x 2" will split current window into 2.
"Cltr-x o" will switch the cursor between the two windows.
"M-x shell" will open up the shell. M is "Alt key"
Tuesday, June 17, 2008
Useful search commands
Search for file with a specific name in a set of files (-name)
find . -name "rc.conf" -print
This command will search in the current directory and all sub directories for a file named rc.conf.
Note: The -print option will print out the path of any file that is found with that name. In general -print wil print out the path of any file that meets the find criteria.
How to search for a string in a selection of files (-exec grep ...).
Examples:
find . -exec grep -s "GMAC reset complete" '{}' \; -print
find . -exec grep -s "GMAC reset complete"#space#'{}'#space#\;#space#-print
Output:
printk(KERN_INFO "GMAC reset complete\n");
./vendor/linux-kernel/arch/arm/mach-oxnas/gmac-napi.c
Very important point to remember is to have a space between the end of the } and \; otherwise bash will complain cannot use the -exec option in find. The -s option in grep is used to suppress all the error message in traditional grep. For newer version of grep, use the -q option.
find . -exec grep "GMAC reset complete" '{}'\; -print
This command will search in the current directory and all sub directories. All files that contain the string will have their path printed to standard output.
If you want to just find each file then pass it on for processing use the -q grep option. This finds the first occurrance of the search string. It then signals success to find and find continues searching for more files.
find . -exec grep -q "www.athabasca" '{}' \; -print
This command is very important for process a series of files that contain a specific string. You can then process each file appropriately. An example is find all html files with the string "www.athabascau.ca". You can then process the files with a sed script to change those occurrances of "www.athabascau.ca" with "intra.athabascau.ca".
find . -name "rc.conf" -print
This command will search in the current directory and all sub directories for a file named rc.conf.
Note: The -print option will print out the path of any file that is found with that name. In general -print wil print out the path of any file that meets the find criteria.
How to search for a string in a selection of files (-exec grep ...).
Examples:
find . -exec grep -s "GMAC reset complete" '{}' \; -print
find . -exec grep -s "GMAC reset complete"#space#'{}'#space#\;#space#-print
Output:
printk(KERN_INFO "GMAC reset complete\n");
./vendor/linux-kernel/arch/arm/mach-oxnas/gmac-napi.c
Very important point to remember is to have a space between the end of the } and \; otherwise bash will complain cannot use the -exec option in find. The -s option in grep is used to suppress all the error message in traditional grep. For newer version of grep, use the -q option.
find . -exec grep "GMAC reset complete" '{}'
This command will search in the current directory and all sub directories. All files that contain the string will have their path printed to standard output.
If you want to just find each file then pass it on for processing use the -q grep option. This finds the first occurrance of the search string. It then signals success to find and find continues searching for more files.
find . -exec grep -q "www.athabasca" '{}' \; -print
This command is very important for process a series of files that contain a specific string. You can then process each file appropriately. An example is find all html files with the string "www.athabascau.ca". You can then process the files with a sed script to change those occurrances of "www.athabascau.ca" with "intra.athabascau.ca".
Subscribe to:
Posts (Atom)